Warning: this page refers to an old version of SFML. Click here to switch to the latest version.
Compiling SFML with CMake
Introduction
Admittedly, the title of this tutorial is a bit misleading. You will not compile SFML with CMake, because CMake is not a compiler. So... what is CMake?
CMake is an open-source meta build system. Instead of building SFML, it builds what builds SFML: Visual Studio solutions, Code::Blocks projects, Linux makefiles, XCode projects, etc. In fact it can generate the makefiles or projects for any operating system and compiler of your choice. It is similar to autoconf/automake or premake for those who are already familiar with these tools.
CMake is used by many projects including well-known ones such as Blender, CLion, KDE, Ogre, and many more. You can read more about CMake on its official website or in its Wikipedia article.
As you might expect, this tutorial is divided into two main sections: Generating the build configuration with CMake, and building SFML with your toolchain using that build configuration.
Installing dependencies
SFML depends on a few other libraries, so before starting to configure you must have their development files installed.
On Windows and macOS, all the required dependencies are provided alongside SFML so you won't have to download/install anything else. Building will work out of the box.
On Linux however, nothing is provided. SFML relies on you to install all of its dependencies on your own. Here is a list of what you need to install before building SFML:
- freetype
- x11
- xrandr
- udev
- opengl
- flac
- ogg
- vorbis
- vorbisenc
- vorbisfile
- openal
- pthread
The exact name of the packages may vary from distribution to distribution. Once those packages are installed, don't forget to install their development headers as well.
Configuring your SFML build
This step consists of creating the projects/makefiles that will finally compile SFML. Basically it consists of choosing what to build, how to build it and where to build it. There are several other options as well which allow you to create a build configuration that suits your needs. We'll see that in detail later.
The first thing to choose is where the projects/makefiles and object files (files resulting from the compilation process) will be created. You can generate them directly in the source tree (i.e. the SFML root directory), but it will then be polluted with a lot of garbage: a complete hierarchy of build files, object files, etc. The cleanest solution is to generate them in a completely separate folder so that you can keep your SFML directory clean. Using separate folders will also make it easier to have multiple different builds (static, dynamic, debug, release, ...).
Now that you've chosen the build directory, there's one more thing to do before you can run CMake. When CMake configures your project, it tests the availability of the compiler (and checks its version as well). As a consequence, the compiler executable must be available when CMake is run. This is not a problem for Linux and macOS users, since the compilers are installed in a standard path and are always globally available, but on Windows you may have to add the directory of your compiler in the PATH environment variable, so that CMake can find it automatically. This is especially important when you have several compilers installed, or multiple versions of the same compiler.
On Windows, if you want to use GCC (MinGW), you can temporarily add the MinGW\bin directory to the PATH and then run CMake from the command shell:
> set PATH=%PATH%;your_mingw_folder\bin
> cmake -G"MinGW Makefiles" ./build
With Visual C++, you can either run CMake from the "Visual Studio command prompt" available from the start menu, or run the vcvars32.bat batch file of your Visual Studio installation in the console you have open. The batch file will set all the necessary environment variables in that console window for you.
> your_visual_studio_folder\VC\bin\vcvars32.bat
> cmake -G"NMake Makefiles" ./build
Now you are ready to run CMake. In fact there are three different ways to run it:
- cmake-gui
This is CMake's graphical interface which allows you to configure everything with buttons and text fields. It's very convenient to see and edit the build options and is probably the easiest solution for beginners and people who don't want to deal with the command line. - cmake
This is the direct call to CMake. If you use this, you must specify all the option names and their values as command line parameters. To print out a list of all options, run cmake -L.
In this tutorial we will be using cmake-gui, as this is what most beginners are likely to use. We assume that people who use the command line variants can refer to the CMake documentation for their usage. With the exception of the screenshots and the instructions to click buttons, everything that is explained below will apply to the command line variants as well (the options are the same).
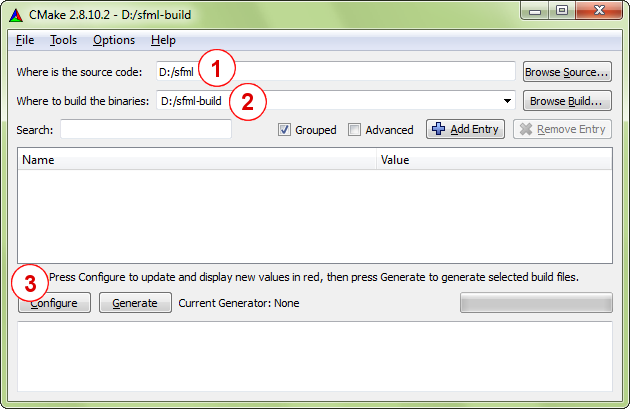
Here is what the CMake GUI looks like:

The first steps that need to be done are as follows (perform them in order):
- Tell CMake where the source code of SFML is (this must be the root folder of the SFML folder hierarchy, basically where the top level CMakeLists.txt file is).
- Choose where you want the projects/makefiles to be generated (if the directory doesn't exist, CMake will create it).
- Click the "Configure" button.
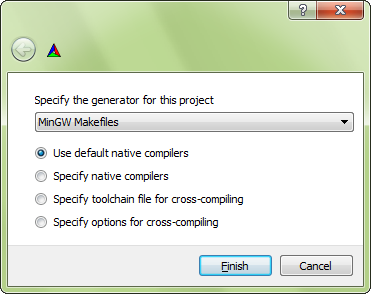
If this is the first time CMake is run in this directory (or if you cleared the cache), the CMake GUI will prompt you to select a generator. In other words, this is where you select your compiler/IDE.

For example, if you are using Visual Studio 2010, you should select "Visual Studio 10 2010" from the drop-down list.
To generate makefiles usable with NMake on the Visual Studio command line, select "NMake Makefiles". To create makefiles usable with MinGW (GCC), select "MinGW Makefiles". It
is generally easier to build SFML using makefiles rather than IDE projects: you can build the entire library with a single command, or even batch together multiple
builds in a single script. Since you only plan to build SFML and not edit its source files, IDE projects aren't as useful.
The installation process (described further down) may not work with the "Xcode" generator. It is therefore highly recommended to use the Makefile generator when building on macOS.
Always keep the "Use default native compilers" option enabled. The other three fields can be left alone.
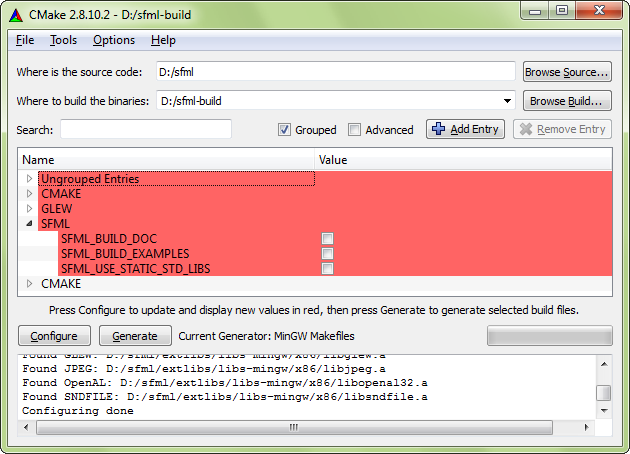
After selecting the generator, CMake will run a series of tests to gather information about your toolchain environment: compiler path, standard headers, SFML dependencies, etc. If the tests succeed, it should finish with the "Configuring done" message. If something goes wrong, read the error(s) printed to the output log carefully. It might be the case that your compiler is not accessible (see above) or configured properly, or that one of SFML's external dependencies is missing.

After configuring is done, the build options appear in the center of the window. CMake itself has many options, but most of them are already set to the
right value by default. Some of them are cache variables and better left unchanged, they simply provide feedback about what CMake automatically found.
Here are the few options that you may want to have a look at when configuring your SFML build:
| Variable | Meaning |
|---|---|
CMAKE_BUILD_TYPE |
This option selects the build configuration type. Valid values are "Debug" and "Release" (there are other types such as "RelWithDebInfo" or "MinSizeRel", but they are meant for more advanced builds). Note that if you generate a workspace for an IDE that supports multiple configurations, such as Visual Studio, this option is ignored since the workspace can contain multiple configurations simultaneously. |
CMAKE_INSTALL_PREFIX |
This is the install path. By default, it is set to the installation path that is most typical on the operating system ("/usr/local" for Linux and macOS, "C:\Program Files" for Windows, etc.). When building frameworks on macOS, you may want to change the value to "/Library/Frameworks". Installing SFML after building it is not mandatory since you can use the binaries directly from where they were built. It may be a better solution, however, to install them properly so you can remove all the temporary files produced during the build process. |
SFML_DEPENDENCIES_INSTALL_PREFIX |
This is the path where SFML's dependencies like Freetype and OpenAL are installed. By default it is the same as As stated above for |
SFML_MISC_INSTALL_PREFIX |
This is the path where SFML examples, documentation, license and readme files are installed. On Windows it defaults to
|
BUILD_SHARED_LIBS |
This boolean option controls whether you build SFML as dynamic (shared) libraries, or as static ones. This option should not be enabled simultaneously with SFML_USE_STATIC_STD_LIBS, they are mutually exclusive.
|
SFML_BUILD_FRAMEWORKS |
This boolean option controls whether you build SFML as
framework bundles
or as
dylib binaries.
Building frameworks requires BUILD_SHARED_LIBS to be selected.It is recommended to use SFML as frameworks when publishing your applications. Note however, that SFML cannot be built in the debug configuration as frameworks. In that case, use dylibs instead. |
SFML_BUILD_EXAMPLES |
This boolean option controls whether the SFML examples are built alongside the library or not. |
SFML_BUILD_DOC |
This boolean option controls whether you generate the SFML documentation or not. Note that the
Doxygen tool must be installed and accessible, otherwise
enabling this option will produce an error. On macOS you can either install the classic-Unix doxygen binary into /usr/bin or any similar directory, or install Doxygen.app into any "Applications" folder, e.g. ~/Applications. |
SFML_BUILD_AUDIO |
This boolean option controls whether the SFML audio module is built or not. |
SFML_BUILD_GRAPHICS |
This boolean option controls whether the SFML graphics module is built or not. |
SFML_BUILD_WINDOW |
This boolean option controls whether the SFML window module is built or not. |
SFML_BUILD_NETWORK |
This boolean option controls whether the SFML network module is built or not. |
SFML_USE_SYSTEM_DEPS |
This boolean option controls whether the dependencies from the extlibs directory are used or whether the system dependencies are used. The stb_image_* header in the extlibs directory are used regardless of this option. |
SFML_USE_STATIC_STD_LIBS |
This boolean option selects the type of the C/C++ runtime library which is linked to SFML. TRUE statically links the standard libraries, which means that SFML is self-contained and doesn't depend on the compiler's specific DLLs. FALSE (the default) dynamically links the standard libraries, which means that SFML depends on the compiler's DLLs (msvcrxx.dll/msvcpxx.dll for Visual C++, libgcc_s_xxx-1.dll/libstdc++-6.dll for GCC). Be careful when setting this. The setting must match your own project's setting or else your application may fail to run. This option should not be enabled simultaneously with BUILD_SHARED_LIBS, they are mutually exclusive. |
SFML_GENERATE_PDB |
The boolean option controls whether Visual Studio should or shouldn't generate PDB files, which are separate files containing the debug symbols needed to debug SFML. |
CMAKE_OSX_ARCHITECTURES |
This boolean option defines which architecture SFML should be compiled for. The recommended value is "x86_64" as 32-bit compilation is not supported. |
SFML_INSTALL_XCODE_TEMPLATES |
This boolean option controls whether CMake will install the Xcode templates on your system or not. Please make sure that /Library/Developer/Xcode/Templates/SFML exists and is writable. More information about these templates is given in the "Getting started" tutorial for macOS. |
SFML_INSTALL_PKGCONFIG_FILES |
This boolean option controls whether CMake will install the pkg-config files on your system or not. pkg-config is a tool that provides a unified interface for querying installed libraries. |
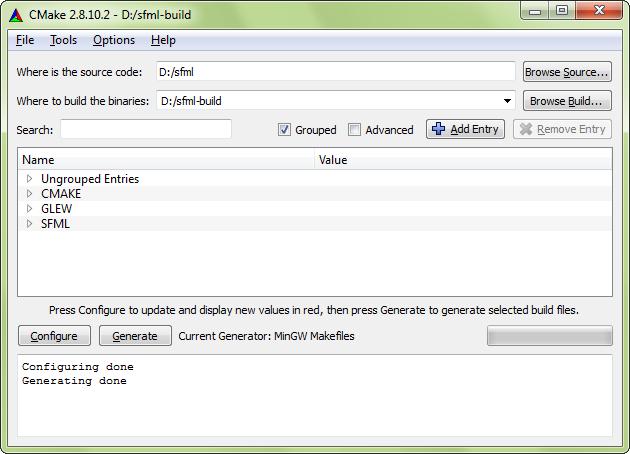
After everything is configured, click the "Configure" button once again. There should no longer be any options highlighted in red, and the "Generate" button should be enabled. Click it to finally generate the chosen makefiles/projects.

CMake creates a variable cache for every project. Therefore, if you decide to reconfigure something at a later time, you'll find that your settings have been saved from the previous configuration. Make the necessary changes, reconfigure and generate the updated makefiles/projects.
Building SFML
Let's begin this section with some good news: you won't have to go through the configuration step any more, even if you update your working copy of SFML. CMake is smart: It adds a custom step to the generated makefiles/projects, that automatically regenerates the build files whenever something changes.
You're now ready to build SFML. Of course, how to do it depends on what makefiles/projects you've generated. If you created a project/solution/workspace, open it with your IDE and build SFML like you would any other project. We won't go into the details here, there are simply too many different IDEs and we have to assume that you know how to use yours well enough to perform this simple task on your own.
If you generated a makefile, open a command shell and execute the make command corresponding to your environment. For example, run "nmake" if
you generated an NMake (Visual Studio) makefile, "mingw32-make" if you generated a MinGW (GCC) makefile, or simply "make" if you generated a Linux
makefile.
Note: On Windows, the make program (nmake or mingw32-make) may not be accessible. If this is the case, don't forget to add its location to your PATH
environment variable. See the explanations at the beginning of the "Configuring your SFML build" section for more details.
By default, building the project will build everything (all the SFML libraries, as well as all the examples if you enabled the SFML_BUILD_EXAMPLES option).
If you just want to build a specific SFML library or example, you can select a different target. You can also choose to clean or install the built
files, with the corresponding targets.
Here are all the targets that are available, depending on the configure options that you chose:
| Target | Meaning |
|---|---|
all |
This is the default target, it is used if no target is explicitly specified. It builds all the targets that produce a binary (SFML libraries and examples). |
sfml-system |
Builds the corresponding SFML library. The "sfml-main" target is available only when building for Windows. |
cocoa |
Builds the corresponding SFML example. These targets are available only if the SFML_BUILD_EXAMPLES option is enabled. Note that some of the
targets are available only on certain operating systems ("cocoa" is available on macOS, "win32" on Windows, "X11" on Linux, etc.).
|
doc |
Generates the API documentation. This target is available only if SFML_BUILD_DOC is enabled.
|
clean |
Removes all the object files, libraries and example binaries produced by a previous build. You generally don't need to invoke this target, the exception being when you want to completely rebuild SFML (some source updates may be incompatible with existing object files and cleaning everything is the only solution). |
install |
Installs SFML to the path given by CMAKE_INSTALL_PREFIX and CMAKE_INSTALL_FRAMEWORK_PREFIX. It copies over the
SFML libraries and headers, as well as examples and documentation if SFML_BUILD_EXAMPLES and SFML_BUILD_DOC are enabled.
After installing, you get a clean distribution of SFML, just as if you had downloaded the SDK or installed it from your distribution's package repository.
|
If you use an IDE, a target is simply a project. To build a target, select the corresponding project and compile it (even "clean" and
"install" must be built to be executed -- don't be confused by the fact that no source code is actually compiled).
If you use a makefile, pass the name of the target to the make command to build the target. Examples: "nmake doc", "mingw32-make install",
"make sfml-network".
At this point you should have successfully built SFML. Congratulations!
