Warning: this page refers to an old version of SFML. Click here to switch to the latest version.
SFML and Xcode (Mac OS X)
Introduction
This is the first tutorial you should read if you're using SFML with Xcode -- and more generally if you are developing applications for Mac OS X. It will show you how to install SFML, set up your IDE and compile a basic SFML program. More importantly, it will also show you how to make your applications ready "out of the box" for the end users.
You will see several external links in this document. They are meant for further reading on specific topics for those who are curious; reading them isn't necessary to follow this tutorial.
System requirements
All you need to create an SFML application is:
- An Intel Mac with Leopard or later
- Xcode (preferably version 4 of the IDE which is available on the App Store)
With recent versions of Xcode you also need to install the Command Line Tools from Xcode > Preferences > Downloads > Components.
If you have Xcode 5, you must use the new version of the templates.
Binaries: dylib vs framework
SFML is available in two formats on Mac OS X. You have the dylib libraries on one hand and the framework bundles on the other hand. Both of them are provided as universal binaries so they can be used on 32-bit or 64-bit Intel systems without any special consideration.
Dylib stands for dynamic library; this format is like .so libraries on Linux. You can find more details in this document. Frameworks are fundamentally the same as dylibs, except that they can encapsulate external resources. Here is the in-depth documentation.
There is only one slight difference between these two kinds of libraries that you should be aware of while developing SFML applications: if you build SFML yourself, you can get dylib in both release and debug configurations. However, frameworks are only available in the release configuration. In either case, it wouldn't be an issue since you would use the release version of SFML when you release your application anyway. That's why the OS X binaries on the download page are only available in the release configuration.
Xcode templates
SFML is provided with two templates for Xcode 4 which allow you to create new application projects very quickly and easily. These templates can create custom projects: you can select which modules your application requires, whether you want to use SFML as dylib or as frameworks, which compiler you want to use and whether to create an application bundle containing all its resources (making the installation process of your applications as easy as a simple drag-and-drop) or a classic binary. See below for more details.
Be aware that these templates are not compatible with Xcode 3. If you are still using this version of the IDE and you don't consider updating it, you can still create SFML applications. A guide on doing that is beyond the scope of this tutorial. Please refer to Apple's documentation about Xcode 3 and how to add a library to your project.
C++ 11
Apple ships a custom version of clang and libc++ with Xcode 4 that partially supports C++11 (i.e. some new features are not yet implemented). If you plan to use C++11's new features, you need to configure your project to use clang and libc++. Also, make sure to download the right version (more details follow).
Installing SFML
First of all you will need to download the SFML SDK which is available on the download page.
If you want to target Mac OS X Leopard (10.5) you have to download the "GCC" version. Keep in mind that this version is not compatible with C++11 features. If you want to use those features you need the "Clang" version, which is compatible with Mountain Lion (10.8) and later.
In order to start developing SFML applications, you have to install the following items:
-
Header files and libraries
SFML is available either as dylibs or as frameworks. Only one type of binary is required although both can be installed simultaneously on the same system. We recommend using the frameworks.- dylib
Copy the content of lib to /usr/local/lib and copy the content of include to /usr/local/include. - frameworks
Copy the content of Frameworks to /Library/Frameworks.
- dylib
-
SFML dependencies
SFML only depends on two external libraries on Mac OS X. Copy sndfile.framework and freetype.framework from extlibs to /Library/Frameworks. -
Xcode 4 templates
This feature is optional but we strongly recommend that you install it. Copy the SFML directory from templates to ~/Library/Developer/Xcode/Templates (create the folders if they don't exist yet).
SFML is shipped with an install.sh script that will install everything for you.
It will also make sure that previous versions of SFML, especially frameworks, are not removed from your system so that your applications can still be executed without modifications.
You just need to open a terminal in the directory of the downloaded SDK and run ./install.sh.
The script will then prompt for your password and install everything in the right place.
Create your first SFML program
We provide two templates for Xcode. SFML CLT generates a project for a classic terminal app whereas SFML App creates a project for an application bundle. We will use the latter here but they both work similarly.
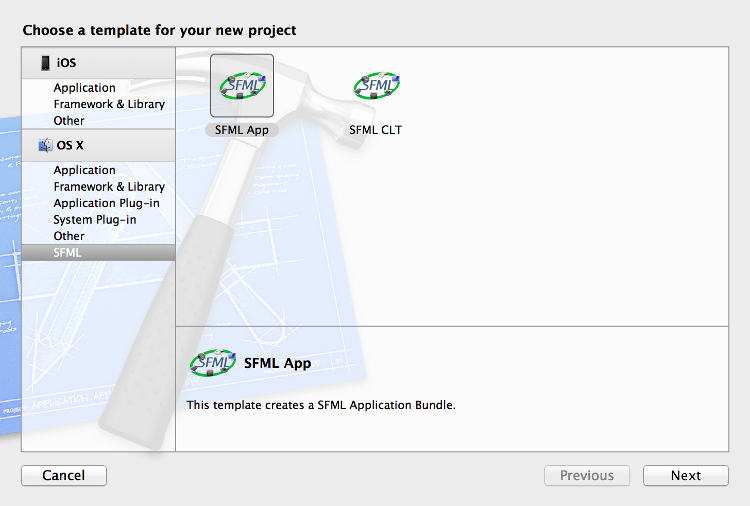
First select File > New Project... then choose SFML in the left column and double-click on SFML App.

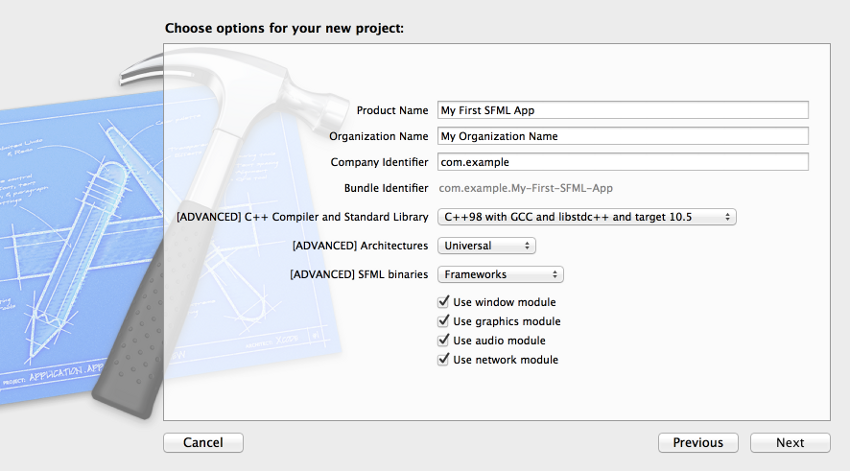
Now you can fill in the required fields as shown in the following screenshot. When you are done click next.

Your new project is now set to create an application bundle ".app".
A few words about the templates settings. If you choose an incompatible option for C++ Compiler and Standard Library you will end up with linker errors. Make sure you follow this guideline:
- If you downloaded the "GCC" version from the download page, you should select C++98 with GCC and libstdc++ and target 10.5.
- If you downloaded the "Clang" version from the download page, you should select C++11 with Clang and libc++.
- If you compiled SFML yourself, you should be able to figure out which option you should use. ;-)
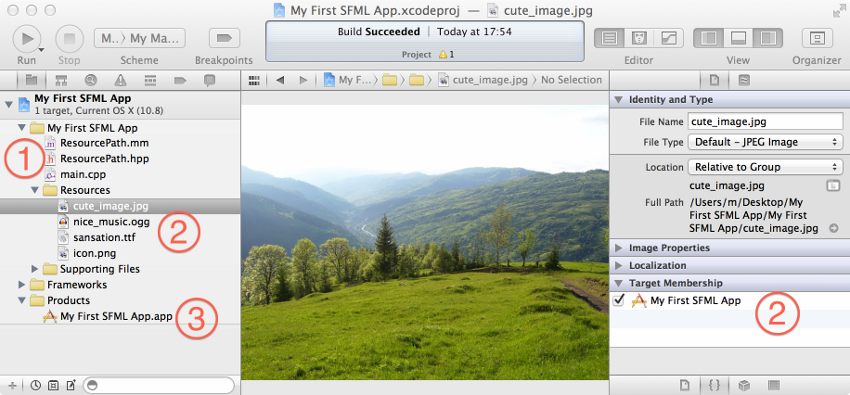
Now that your project is ready, let's see what is inside:

As you can see, there are already a few files in the project. There are three important kinds:
-
Header & source files: the project comes with a basic example in main.cpp and the helper function
std::string resourcePath(void);in ResourcePath.hpp and ResourcePath.mm. The purpose of this function, as illustrated in the provided example, is to provide a convenient way to access the Resources folder of your application bundle.
Please note that this function only works on Mac OS X. If you are planning to make your application work on other operating systems, you should implement your own version of this function on the operating systems in question. -
Resource files: the resources of the basic example are put in this folder and are automatically copied to your application bundle when you compile it.
To add new resources to your project, simply drag and drop them into this folder and make sure that they are a member of your application target; i.e. the box under Target Membership in the utility area (cmd+alt+1) should be checked. - Products: your application. Simply press the Run button to test it.
The other files in the project are not very relevant for us here. Note that the SFML dependencies of your project are added to your application bundle in a similar in which the resources are added. This is done so that your application will run out of the box on another Mac without any prior installation of SFML or its dependencies.
