Warning: this page refers to an old version of SFML. Click here to switch to the latest version.
SFML and Code::Blocks (MinGW)
Introduction
This tutorial is the first one you should read if you're using SFML with the Code::Blocks IDE, and the GCC compiler (this is the default one). It will explain how to configure your SFML projects.
Installing SFML
First, you must download the SFML SDK from the download page.
There are multiple variants of gcc for Windows, which are incompatible with each other (different exception management,
threading model, etc.). Make sure you select the package which corresponds to the version that you use. If you are unsure, check which of
the libgcc_s_sjlj-1.dll or libgcc_s_dw2-1.dll files is present in your MinGW/bin folder. If MinGW was installed along with Code::Blocks,
you probably have an SJLJ version.
If you feel like your version of gcc can't work with the precompiled SFML libraries, don't hesitate to
build SFML yourself, it's not complicated.
You can then unpack the SFML archive wherever you like. Copying headers and libraries to your installation of MinGW is not recommended, it's better to keep libraries in their own separate location, especially if you intend to use several versions of the same library, or several compilers.
Creating and configuring a SFML project
The first thing to do is choose what kind of project to create. Code::Blocks offers a wide variety of project types, including an "SFML project". Don't use it! It hasn't been updated in a long time and is likely incompatible with recent versions of SFML. Instead, create an Empty project. If you want to get rid of the console, in the project properties, go to the "Build targets" tab and select "GUI application" in the combo box instead of "Console application".
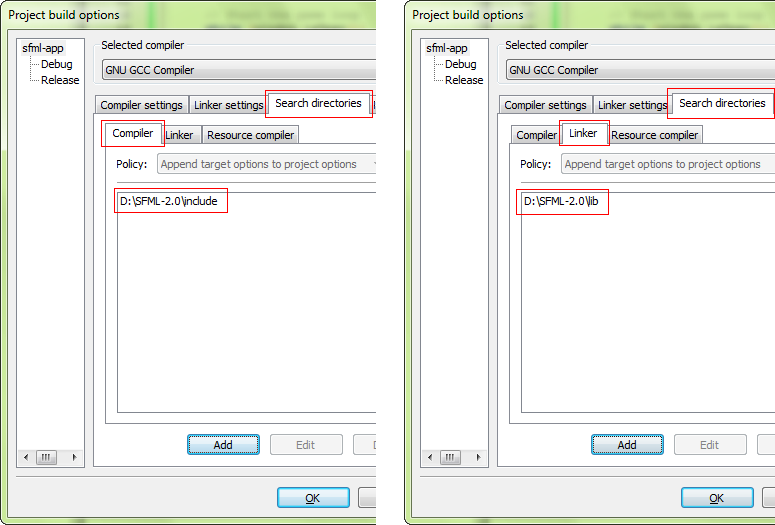
Now we need to tell the compiler where to find the SFML headers (.hpp files), and the linker where to find the SFML libraries (.a files).
In the project's "Build options", "Search directories" tab, add:
- The path to the SFML headers (<sfml-install-path>/include) to the Compiler search directories
- The path to the SFML libraries (<sfml-install-path>/lib) to the Linker search directories
These paths are the same in both Debug and Release configuration, so you can set them globally for your project.

The next step is to link your application to the SFML libraries (.a files) that your code will need. SFML is made of 5 modules (system, window, graphics,
network and audio), and there's one library for each of them.
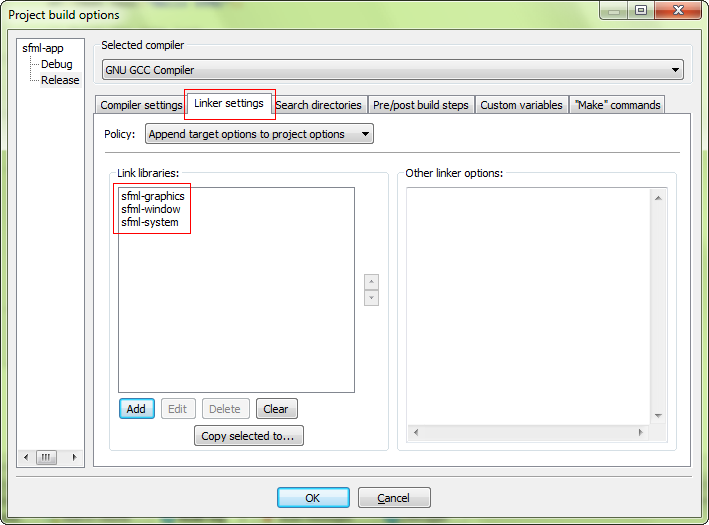
Libraries must be added to the "Link libraries" list in the project's build options, under the "Linker settings" tab. Add all the SFML libraries that you need, for
example "sfml-graphics", "sfml-window" and "sfml-system" (the "lib" prefix and the ".a" extension must be omitted).

It is important to link to the libraries that match the configuration: "sfml-xxx-d" for Debug, and "sfml-xxx" for Release. A bad mix may result in crashes.
When linking to multiple SFML libraries, make sure that you link them in the right order, it is very important for gcc. The rule is that libraries that depend on other libraries must be put first in the list. Every SFML library depends on sfml-system, and sfml-graphics also depends on sfml-window. So, the correct order for these three libraries would be: sfml-graphics, sfml-window, sfml-system -- as shown in the screen capture above.
The settings shown here will result in your application being linked to the dynamic version of SFML, the one that needs the DLL files.
If you want to get rid of these DLLs and have SFML directly integrated into your executable, you must link to the static version. Static SFML
libraries have the "-s" suffix: "sfml-xxx-s-d" for Debug, and "sfml-xxx-s" for Release.
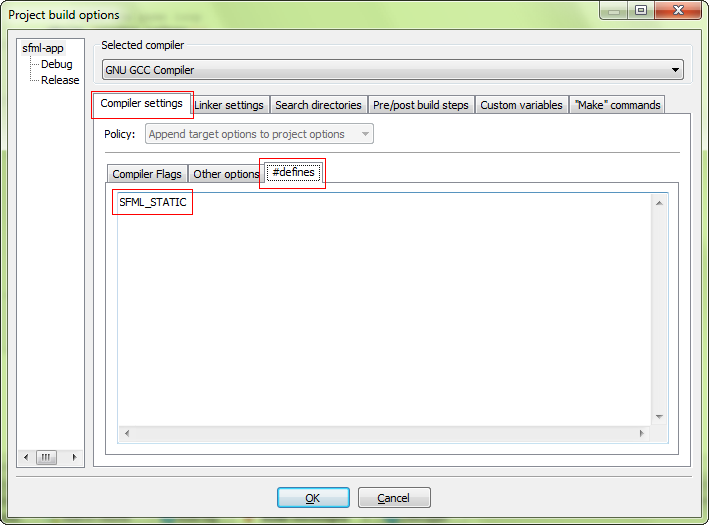
In this case, you'll also need to define the SFML_STATIC macro in the preprocessor options of your project.

If you don't know the differences between dynamic (also called shared) and static libraries, and don't know which one to use, you can search for more information on the internet. There are many good articles/blogs/posts about them.
Your project is ready, let's write some code now to make sure that it works. Add a "main.cpp" file to your project, with the following code inside:
#include <SFML/Graphics.hpp>

int main()
{
    sf::RenderWindow window(sf::VideoMode(200, 200), "SFML works!");
    sf::CircleShape shape(100.f);
    shape.setFillColor(sf::Color::Green);

    while (window.isOpen())
    {
        sf::Event event;
        while (window.pollEvent(event))
        {
            if (event.type == sf::Event::Closed)
                window.close();
        }

        window.clear();
        window.draw(shape);
        window.display();
    }

    return 0;
}
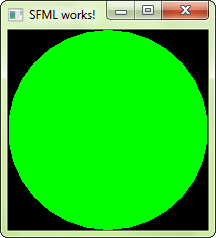
Compile it, and if you linked to the dynamic version of SFML, don't forget to copy the SFML DLLs (they are in <sfml-install-path/bin>) to the directory where your compiled executable is. Run it, and if everything works you should see this:

If you are using the sfml-audio module (regardless whether statically or dynamically), you must also copy the DLLs of the external libraries needed by it,
which are libsndfile-1.dll and OpenAL32.dll.
These files can be found in <sfml-install-path/bin> too.
